UPDATE: Scrivener for iOS is currently in Beta!
http://www.literatureandlatte.com/blog/?p=594
In the meantime, there is way you can read and edit Scrivener files on your iPhone and Ipad and it's called Folder Sync.
Folder sync makes a backup of Scrivener files to the folder of your choice as RTF files (Rich Text Format) that can be read by RTF mobile word processors.
By using an iCloud-compatible RTF iOS word processor you can get at the files and edit them on an iPhone or iPad. First Download an app that reads & writes RTF and has iCloud capability. I'll use the free RTF Write for iOS as an example, but there are others that work as well.
So here are the steps to get it up and running using iCloud and the free RTF Write. For those wanting to use a dropbox solution see the last paragraph of this article.
1. DOWNLOad "RTF Write" for iOS and Install it
RTF Write (free) for iPhone/iPad
2. GET YOU DESKTOP READY TO USE YOUR ICLOUD DRIVE
To get your desktop computer ready, make sure Cloud Support is turned on in your Mac's Settings app. You may need to enter your Apple ID (the email and password you use to buy stuff in the Apple Store). To get it to turn on.


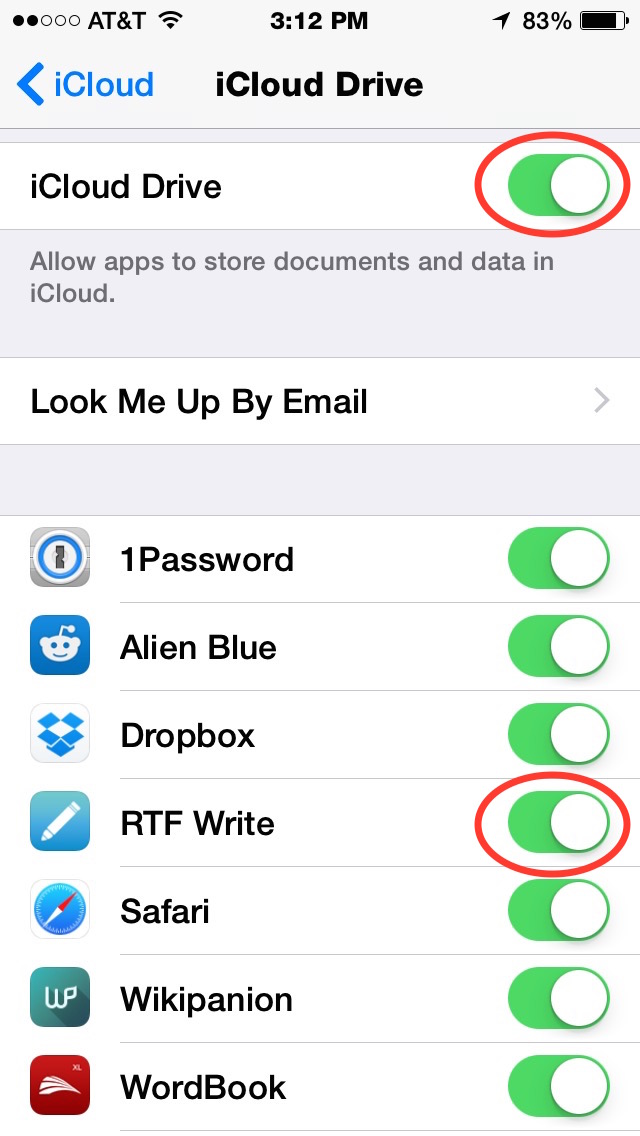
3. Get Your iPhone or iPad Ready for iCloud
Click the Settings App and scroll down to iCloud Drive and select it and make sure the iCloud Drive is turned on. And then scroll down and make sure RTF Write is also turned on. (Tip: if you haven't done so, turn on Find My iPhone and any app you want backed up to iCloud.)

4. STARTUP RTF WRITE ON YOUR IPHONE OR IPAD AND SAVE A test DOC TO ICLOUD
Install the mobile app on your iOS device and start it up. Go to settings, if it has it in the app, and turn on "iCloud Support" Some apps have a setting, some automatically connect to iCloud.
Make a test document and save (or exit the program to save). This will create a folder for your word processing app in your iCloud Drive. It make take a few minutes for it to be created in iCloud and moved to your desktop computer the first time.
5. MAKE IT EASY TO ACCESS YOUR ICLOUD DRIVE
To make sure your iCloud Drive shows up in your finder window, go to the Finder Menu > Preferences and check the box next to iCloud Drive. It will now show up in the sidebar of any finder window.

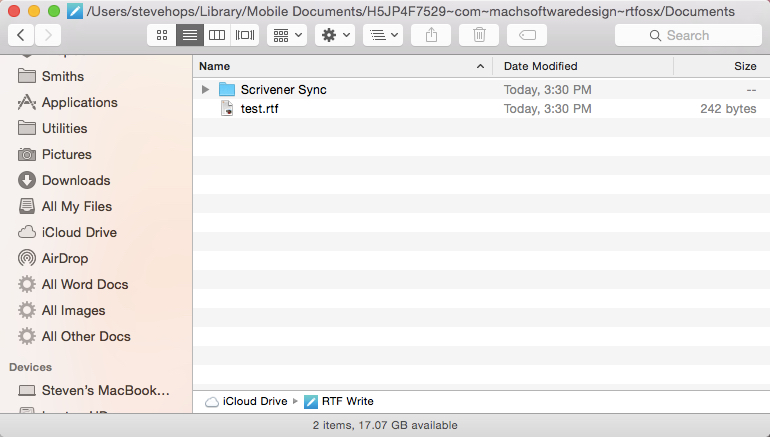
6. CREATE A SCRIVENER SYNC FOLDER INSIDE YOUR WORD PROCESSOR'S ICLOUD FOLDER
On your iCloud drive, open your word processors folder. If you don't see a folder, you may need to open your mobile app and save another file to get iCloud to create the default folder. If this doesn't work, your app either doesn't have iCloud support or you haven't turned it on.
Open the RTF Write folder (or whatever app you installed) and create another folder inside of it. This is the folder we will use for the folder sync. I named mine Scrivener Sync, but you will probably want a folder for each project, since Scrivner will overwrite anything in that folder.

Inside this folder is where you will want a Scrivener Sync Folder to go. Do this before you turn on Folder Sync, because this folder already needs to exist. You will want to make a Sync folder here for each project, as Scrivener will write over anything inside that folder. I named this test one, "Scrivener Sync," but I usually name them the same as the Scrivener Project File.
7. TURN ON SCRIVENER'S FOLDER SYNC
Go into your Scrivener project and select the Folder Sync options. It is under File > Sync >Sync with External Folder.

Next to Share Folder, click "Choose", then navigate to iCloud Drive > RTF Write > Scrivener Sync.

Here you can also select what you want to sync. It can just be your novel's chapter/text docs or you can sync all your other texts like research, character bios, etc. Or you can limit the sync to a collection of documents.
In this dialog you can also choose to prefix the document names with numbers, this will show you their position in the binder. I recommend turning this on to keep chapters in order. DO NOT RENUMBER the documents. This is will not reorder them when they are imported back into Scrivner, it will just make new files.
I also select the "Take snapshot of affected documents before updating" box. If something goes wrong with a sync, I can always roll the document back to a previous version.
Most importantly, make sure "Check external folder on project open and automatically sync on close" is checked. This is what makes it all automatic on Scrivener's open and close.
If the Scrivener's Sync finds a new file in the folder, the import menu lets you specify where it will be imported into your Scrivener project.
And finally, you can select the export and import file types. For most applications I would leave both at RTF.
So that's it. This is my binder:

This is how the Binder files look on my hard drive after I close my document and Scrivener syncs to this folder. (Note, you could also edit these files with a desktop program like Word. Just be sure to keep them as RTF documents and don't rename them.) They look out of order here, but inside RTF Write I can order them by prefix numbers. Don't rename the documents, unless you want Scrivener to think they are new files. That includes renaming the prefix numbers.

And, finally, this is what it looks like in RTF Writer on my iPhone 5.

Once you do this the first time, it become easy to make new sync folder inside the RFT Write iCloud folder and turn this on for each project.
Keep in mind you have limited free space on iCloud, but you can delete items (like photos) to make room or buy space if you run out.
This technique works for any iOS word processor that uses iCloud and reads/writes/edits RTF files.
To Sync Scrivener Documents on an iPad Using Dropbox and Texilus or Notability.
If you prefer to use dropbox or can't use iCloud.
1. download and install Dropbox on your iPad and your desktop.
Dropbox 2GB Free
2. Download and install an RTF word processor that uses Dropbox
Textilus (you need the $6.00 upgrade)
or
Notability ($3.99)
In step 6 above you will be creating the sync folder inside the Dropbox folder. Then do Step 7. Make sure to turn on Dropbox backup in the app and set the file type to RTF, if needed.
